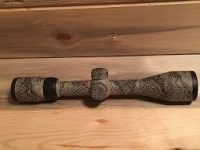
Hydro dipping is one way of giving your rifle scope a personalized touch and making it look different. It is therefore good to learn and understand how to hydro dip a rifle scope.
Whether you are a seasoned hunter or a professional, giving your rifle scope, a unique look is quite critical. It guarantees that your rifle can stand out while placed with others
However, the process of hydro dipping can be a challenge, especially if you are doing it for the first time. Considering that not all scopes are water-resistant or even how long your scope can stay submerged in water and still perform excellently.
If you are unsure about your rifle scope and whether it can be submerged in water and still perform, then going to the experts for hydro dipping is quite an in order. However, this could be expensive hence requires adequate planning. On the other hand, if you choose to hydro dip your rifle at home, it is essential to invests in the right equipment for the job. It is also good to know how to clean your spotting scope.
What Is Hydro Dipping?
Hydro dipping is a unique process of applying graphics to an object; it is also known as hydro imaging, water transfer printing, or immersion printing. It has been used for years in various fields, including the auto industry. The process is applicable to metal, plastic, wood, and another substance or material that cannot be affected by water. Now that you know what hydro dipping is and its importance on your rifle scope, here are some basics of hydro dipping guide to get you started.
Step by step guide on how to hydro dip a Rifle scope
How do you do it?
Step 1: Paint the Base Coat
Before you hydro dip your rifle scope, it is recommended that you ensure it has an undercoat. This will help in ensuring that the graphic sticks on the rifle, and it gets the shape you desire. The base coat should either be white or tan.
The primary purpose of the undercoat layer is to give the other painting a vibrant look and ensure that it holds perfectly on the item. While applying the undercoat, it is essential that you be extra careful and avoid fingerprints to get a smooth finish.
You can also use spray paint while applying the undercoat. However, ensure that you don’t spray in a crowded place to avoid inconveniencing others. Once you have thoroughly applied the base coat to your satisfaction, leave the rifle to rest for up to 24 hours for the paint to dry evenly.
Step 2: Prepare Your Paint for a Hydro Dip
Fill water in a container about 4/5 full then add different paints in alternating times. You can use as many colors as you wish to ensure that you get your desired look. As you spray the paint, ensure that you notice color migrating to the outside. Use a starring tool to mix colors evenly to your satisfaction.
Ensure to stir from one end to the other for you to achieve a uniform look of the hydro dip. Also, keep the staring gentle to avoid corrupting the initial paint sequence. After starring, you should notice the paint resting on top of the water in a pattern.
Step 3: Dip Your Rifle
Gently place the rifle scope in the concentrated mixture until it soaks in the water completely. Once the entire rifle is submerged, push it down towards the ink and ensure the movement is uniformed. This will help you achieve better results as the ink attaches to the rifle. Repeat the same movement for approximately three minutes for the enhanced effects.
Before you dip the rifle, ensure to wear gloves to protect yourself from getting the paint on your hands. Additionally, it is essential to minimize your hand movement when holding the rifle. This will guarantee that you get a uniformed finish style with minimal fingerprints interference on the scope.
Step 4: Rinse It
Once you are satisfied that the rifle has gotten the expected results, gently remove it from the water. Hold it firmly to avoid rubbing its surface. After a few seconds, rinse the rifle thoroughly in cold water for a few more minutes.
When rinsing, you should not scrap the rifle with your hands as this could remove all the paint. Rinsing helps in removing any PVA residue for a perfect finish.
Step 5: Let It Dry
Place your rifle under a shed to allow the paint to dry evenly by air. Ensure to avoid the direct sun while drying the rifle. Instead, put it under a shed where it will dry gently for a couple of hours.
Although it could be easy to dry the rifle on the direct sun, the paint could easily pear hence make the entire process in vain. On the other hand, drying it under a shed gives the paint sufficient time to hold on the rifle.
Step 6: Apply the Topcoat
After hydro dipping your rifle and it completely dries, it is time to apply the topcoat. The topcoat guarantees that your rifle has a shiny finish style and also enhances the pattern durability. Depending on your liking, you can apply up to three coats.
As you spray the topcoat, ensure you avoid placing your fingerprints for better results. Once you are satisfied, let the rifle scope rest for up to 24 hours to dry. Ensure you place it in a convenient place where there are minimal risks of being touched before it completely dry.
Conclusion
Hydro dipping allows you to personalize your rifle to your liking. It guarantees that your rifle scope will also have a unique style that symbolizes your adventure. Unlike regular painting, hydro dipping allows you to use different painting and achieve an exceptional finish.
When done correctly, hydro dipping protects your rifle scope from rust and keeps it looking unique. It also ensures that you can hide while out hunting without drawing unnecessary attention, especially to your prey.
However, the process takes time to learn and master, depending on your rifle. Therefore, if you are not sure, it is always good to have a professional take you through the process. Additionally, you can always buy a hydro dip kit that is already prepared. Most importantly, before you dip your rifle scope in water, ensure that is water resistant and can withstand staying underwater for a couple of minutes.